Okay, I admit. The chance of me actually finding the time to whip up any of these is slim (read, non-existent.)
But these recipes from Dr. Oetker are just too lovely not to share…
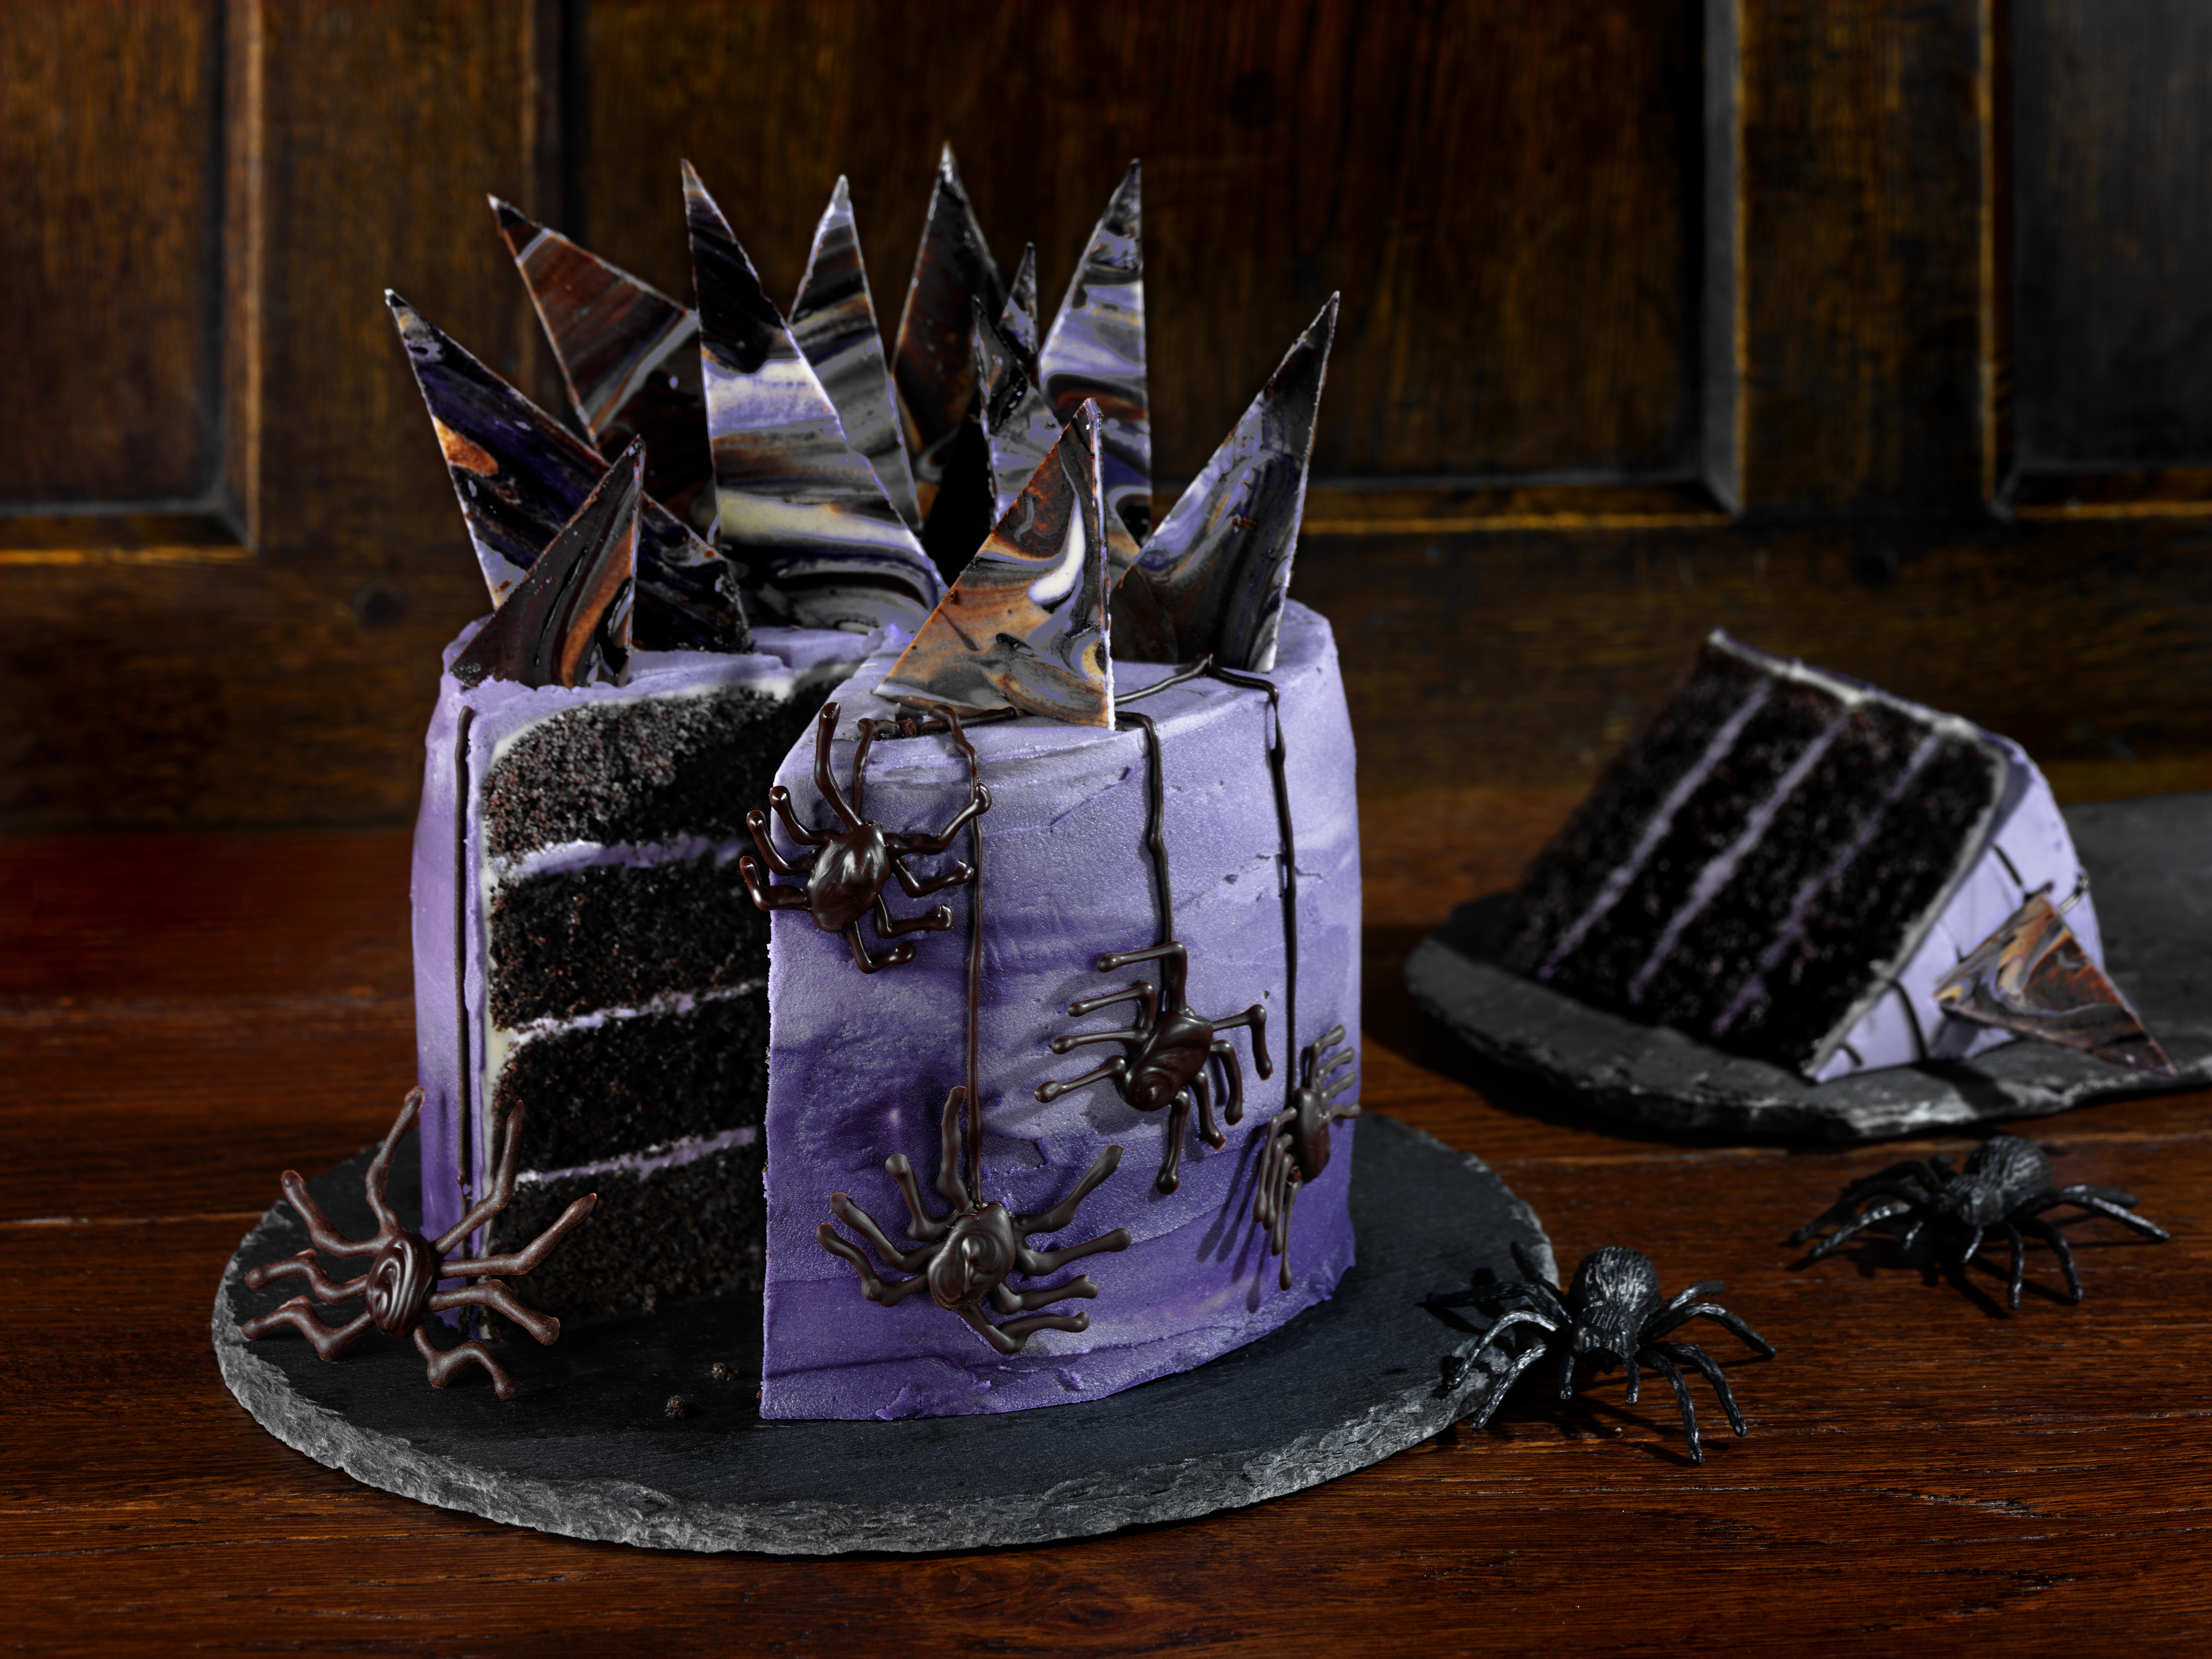
Gothic Black Velvet Halloween Cake
Preparation time: 2 hours plus chilling, cooling and setting
Cooking time: 55 minutes (including 5 minutes to melt the chocolate)
Serves: 10
Ingredients
- 225g (8oz) Baking margarine
- 225g (8oz) Dark brown soft sugar, free of lumps
- 4 Medium eggs
- 225g (8oz) Plain flour
- 2 sachets / 50g (2oz) Dr. Oetker Fine Dark Cocoa Powder
- 3 sachets/ 15g (1/2 oz) Dr. Oetker Baking Powder (gluten free)
- 2 tubes Dr. Oetker Extra Strong Black Food Colour Gel
To decorate:
- 100g (3 ½ oz) Dr. Oetker 72% Extra Dark Fine Cook’s Chocolate
- 50g (2oz) Dr. Oetker White Fine Cook’s Chocolate
- 1 tube Dr. Oetker Extra Strong Violet Food Colour Gel
- 165g (5 ½ oz) Unsalted butter
- 325g (11oz) Icing sugar
- 5ml (1 tsp) Dr. Oetker Madagascan Natural Vanilla Extract
Method
1. Preheat the oven to 180ºC (160ºC fan oven, 350ºF, gas 4). Grease and line 2 x deep, 15cm (6 inch) round cake tins. Put the margarine and sugar in a bowl and add the eggs.
2. Sieve the flour, Cocoa and Baking Powder on top. Squeeze in both tubes of Black Food Colour Gel. Using an electric mixer set on a low speed, blend the ingredients together. Increase the speed and whisk for a few seconds until creamy and well blended.
3. Divide the mixture equally between the prepared tins, smooth the tops and bake for about 50 minutes, until firm to the touch and a skewer inserted into the centre of the cake comes out clean. Cool for 5 minutes then turn the cakes out on to a wire rack to cool completely.
4. To decorate, line a board with a sheet of parchment. Break up the Extra Dark Chocolate into a heatproof bowl and break and put the White Chocolate in another bowl. Sit both bowls over saucepans of barely simmering water and leave to melt.
5. Pour half the Extra Dark Chocolate on to the centre of the parchment in a neat pool (sit the remaining melted chocolate back on the saucepan of water to keep warm) and then pour the white chocolate in a pool directly on top.
6. Drizzle the White Chocolate with a few drops of Violet Food Colour Gel. Working quickly, spread gently using a small palette knife to marble the Gel into the White Chocolate a little to give it Violet streaks, and then marble the White Chocolate into the Extra Dark Chocolate. Tap the board on the work surface to settle the chocolate and make a square approx. 18cm (7 inch). Add a few drops more Violet Gel, if liked, and swirl into the chocolate a little more, tap again and then put in a cool place to set.
7. Load the remaining melted Extra Dark Chocolate into a small uncut piping bag. Snip off a small point and then pipe sets of 4 pairs of legs on the other lined board. Once you have piped 10-12 sets of legs, pipe a blob in the centre for the body. You may find it easier to trace spider shapes if you don’t feel confident piping free-hand. You will find it easier to pipe any melted chocolate if it is not piping hot; once it cools slightly, it becomes a bit thicker and is easier to control when piping. Once piped, place the spiders in a cool place to set.
8. Squeeze out the remaining dark chocolate from the bag back into the bowl – you will need to be able to re-melt this once the cake is decorated in order to pipe a web design on top.
9. Now make up the buttercream icing. Put the butter in a large bowl and beat until smooth. Gradually sieve and mix in the icing sugar to make a smooth, creamy icing. Stir in the Vanilla extract.
If necessary, trim the tops off the cakes to make them flat, then cut both cakes equally through the middle to make 4 layers in total.
10. Put 225g (8oz) of the icing in a bowl and add 25 drops Violet Food Colour Gel and mix well to make a pale Violet icing. Spread 3 layers of cake with 150g (5oz) of this icing and sandwich all the layers together. Cover and keep the remaining pale Violet icing.
11. Spread and smooth 150g (5oz) of the uncoloured buttercream round the sides and over the top of the cake to cover it thinly but evenly, making sure the finish is smooth and neat. Running the warmed blade of a palette knife flat against the cake will help you to achieve a smooth effect. Chill the cake for 30 minutes to firm up the icing. This thin covering of icing known as a crumb coat will give you a good base to add the rest of the icing to.
12. Divide the remaining uncoloured icing between 2 bowls. Add 2.5ml (1/2 tsp) Violet Food Colour Gel to one portion and 15 drops to the other. Mix both portions well, to make a deep Violet shade and a mid-Violet shade.
13. Once the cake has chilled, spread and smooth the deep Violet icing round the bottom edge of the cake to cover it thinly but completely. Continue spreading the icing to come just about halfway up the side of the cake. Spread the mid-Violet icing round the rest of the cake, spreading it so that it meets and slightly covers the deep Violet icing, and continue spreading up the cake to just below the top edge.
14. Spread the remaining pale Violet icing smoothly on top of the cake and over the top edge of the cake to meet the mid-Violet icing. Make sure the top edge is smooth and flat. Run the warmed blade of a palette knife flat against the side, around the cake, to help you achieve a smooth, subtly blended effect. Transfer to a serving plate or board. Leave aside in a cool place to firm.
15. To finish the cake, re-melt the reserved Extra Dark Chocolate, cool for 10 minutes then place in another small uncut piping bag. Snip off a small point and carefully pipe concentric circles over the top of the cake to reach the middle. Pipe varying lengths of chocolate down the sides of the cake at intervals to make web drops for the chocolate spiders. Leave in a cool place for a few minutes to set.
16. Carefully peel the spiders from the parchment and stick on to the web drops using a little dab of melted chocolate. Use any remaining spiders to decorate the serving plate or board.
17. Break up the marbled chocolate square into random shards and stick into the top of the cake at vertical angles. If you want to make sharper points, let the chocolate square stand at room temperature for a few minutes; this way you should be able to cut more pointed angles using a sharp knife.
18. Carefully press the shards into the top of the cake, so that they stand upright. Your stunning, Gothic-style cake is now ready to serve and impress!
TIP: For the best glossy appearance, crisp texture and improved storage, you should temper chocolate for decorating work. To do this, cut into small pieces or grate the quantity of chocolate stated in your recipe. Place two thirds of the chocolate in a bowl to melt, stirring and checking the temperature until it reaches 50ºC (120ºF). Remove from the water and stir the chocolate to cool it to between 35-38ºC (95-100ºF). Stir in the remaining chopped
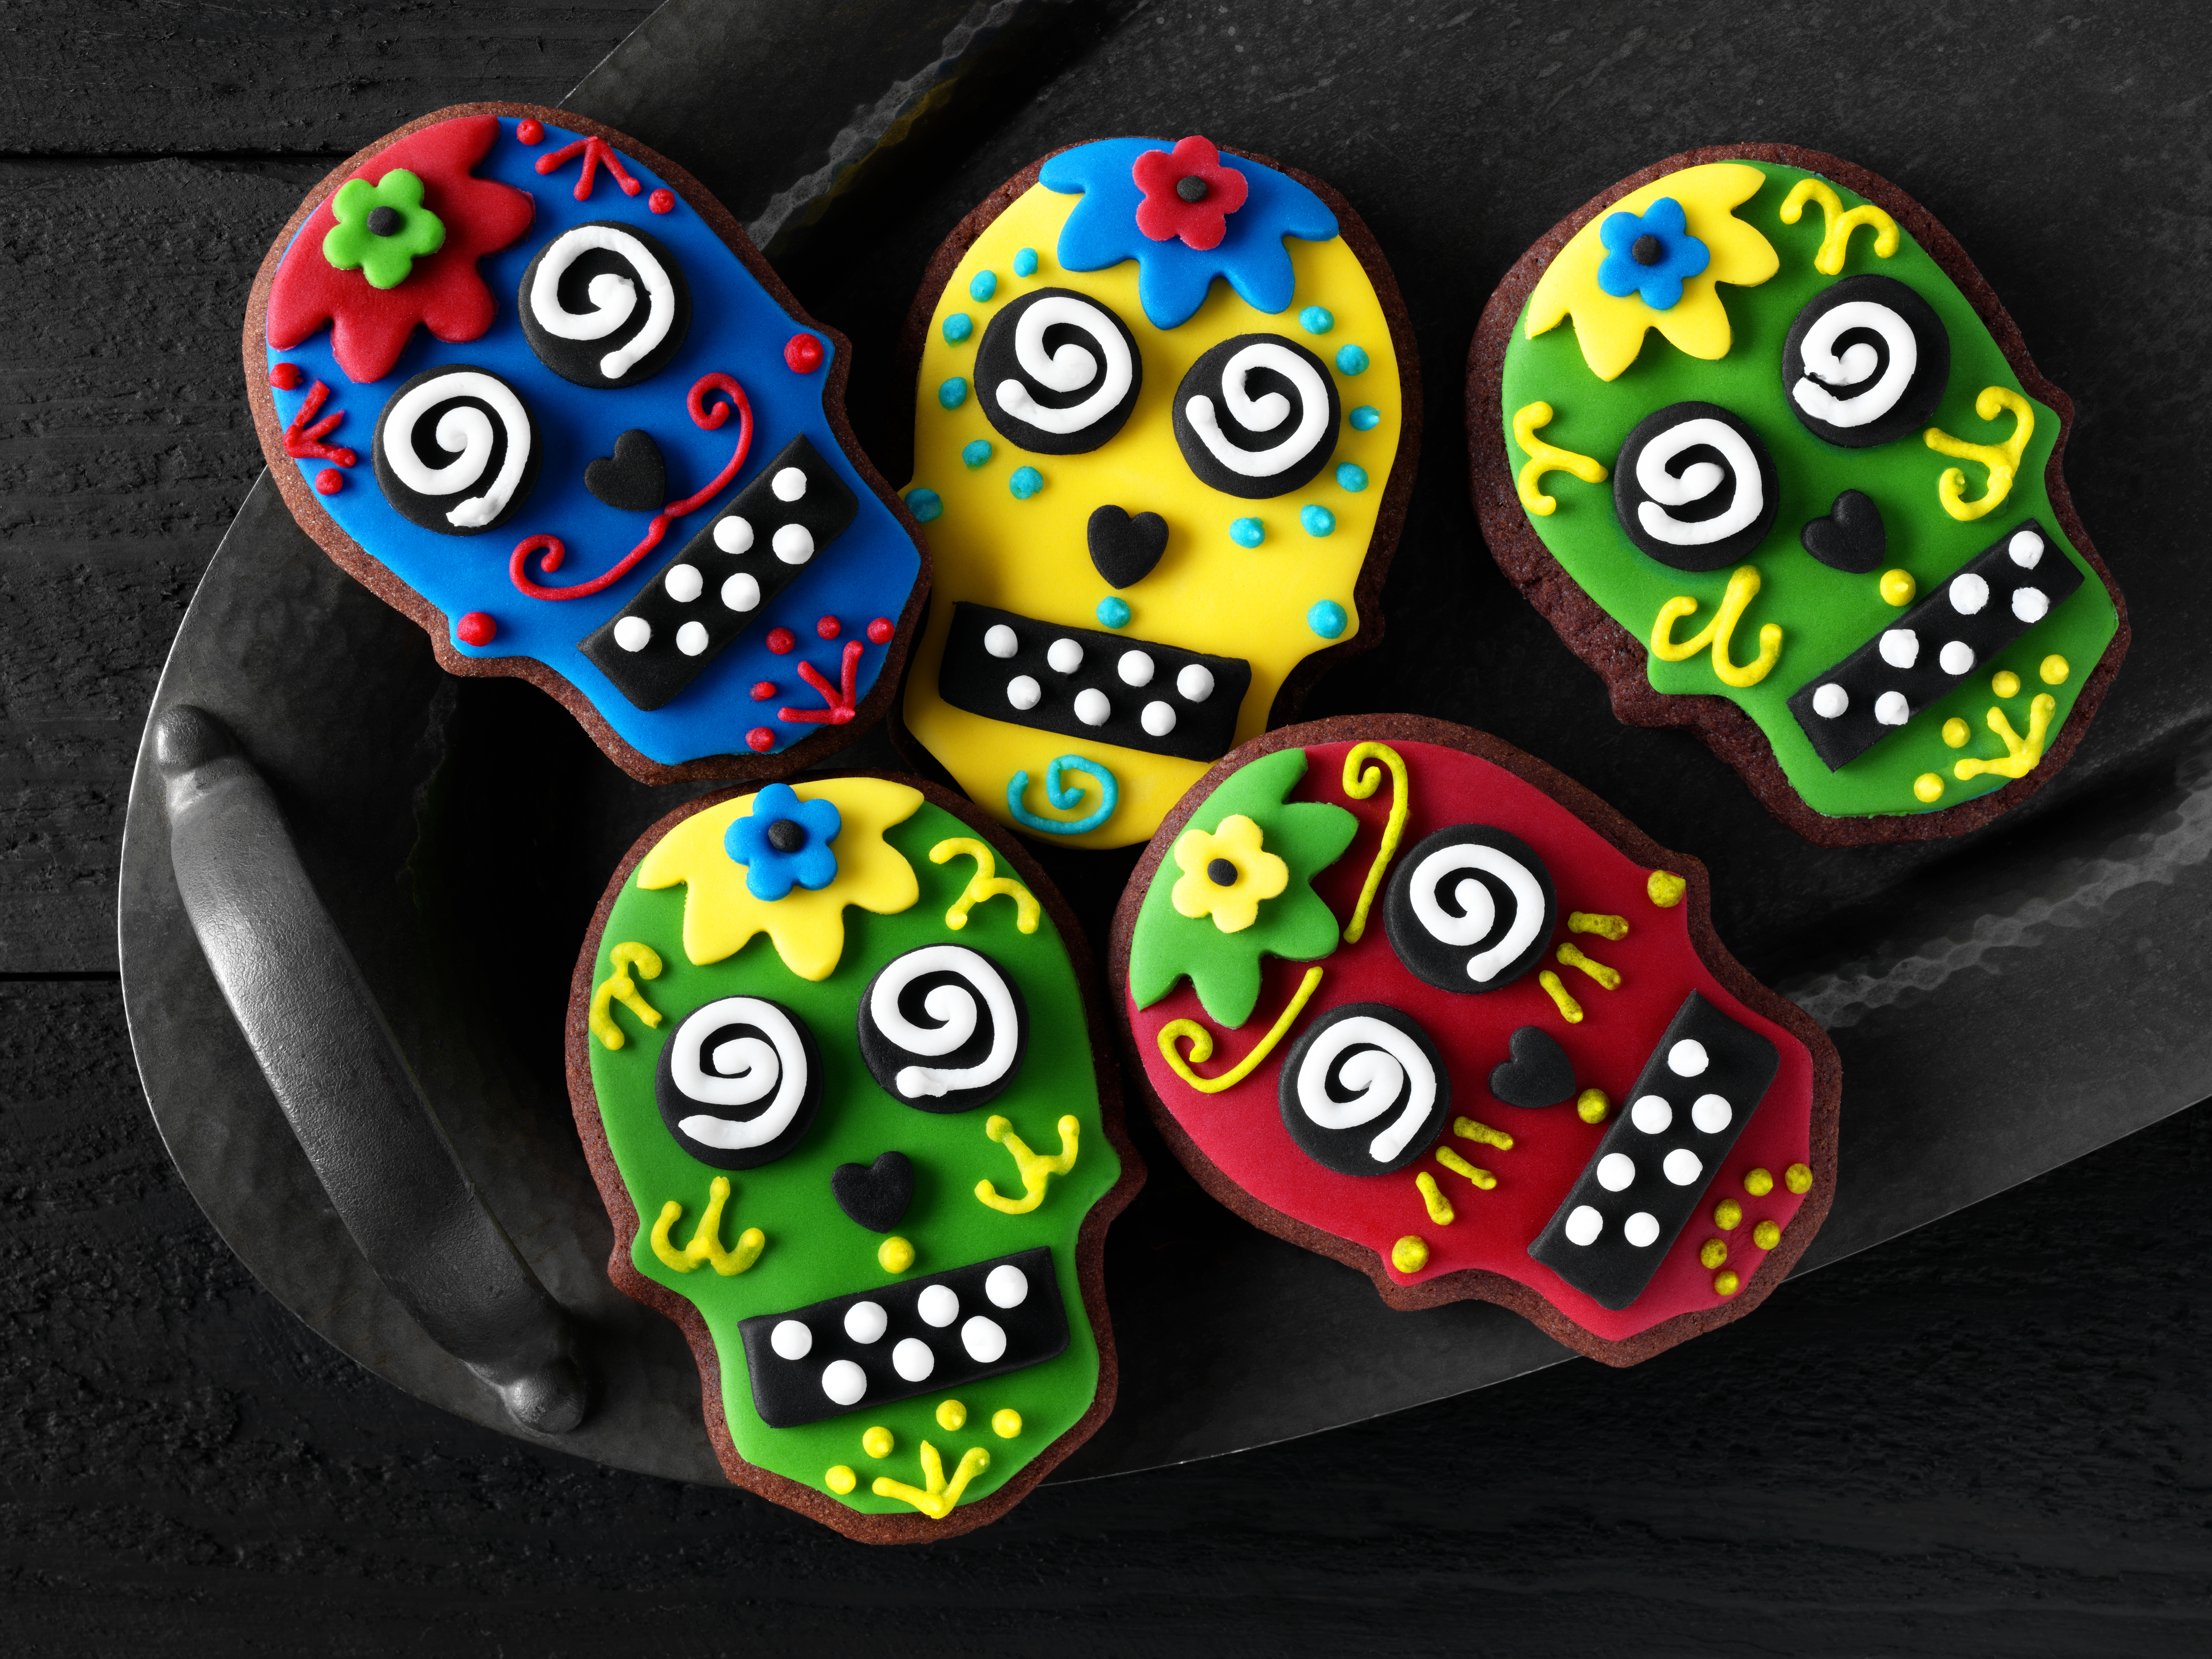
Chocolate Skull Cookies
Preparation time: 1 hour plus chilling, cooling and setting
Cooking time: 15 minutes
Makes: 16
Ingredients:
- 125g (4 ½ oz) Lightly salted butter, softened
- 125g (4 ½ oz) Caster sugar
- 1 Medium egg, beaten
- 225g (8oz) Plain flour
- 1 sachet / 25g (1oz) Dr. Oetker Fine Dark Cocoa Powder
- 1 sachet /5g (1 tsp) Dr. Oetker Baking Powder
- 6g (10ml/2 level tsp) Ground cinnamon
To decorate:
- Dr. Oetker Ready to Roll Regal-Ice Coloured
- Icing sugar to dust
- 15ml (1 tbsp) Clear honey
- Dr. Oetker White Designer Icing
- Dr. Oetker Writing Icing Brights
Method
1. Line 2 large baking trays with baking parchment. In a bowl, beat the butter and caster sugar together until soft and creamy. Whisk in the egg.
2. Sift the flour, Cocoa, Baking Powder and cinnamon on top and stir well. Using your hands, bring the mixture together to form a firm dough. Turn on to a lightly floured surface and knead until smooth and pliable.
3. Roll out the dough to 1/2 cm (1/4inch) thick. Using an 8cm (3 inch) long skull-shaped cutter, cut out 16 skull shapes, re-rolling the dough as necessary. Arrange on the baking trays, prick with a fork and chill for 30 minutes. (If you do not have a skull cutter then a gingerbread man cutter or circular cutter can be used).
4. Ten minutes before baking, preheat the oven to 180ºC (160ºC fan oven, 350ºF, gas 4). Bake the cookies for about 15 minutes until firm. Leave to cool on the baking trays for 5 minutes before transferring to a wire rack to cool completely.
5. To decorate, using the Red, Green, Yellow and Blue Ready to Roll Icing, and working on each colour separately, knead gently to make pliable. Dust the work surface lightly with icing sugar then roll out each colour to the thickness of a £1 coin. Using the same skull cutter, stamp out 4 skull shapes from each colour, re-rolling the trimmings as necessary. Once you have 16 icing skulls, gather up and keep the coloured trimmings for decoration.
6. Brush the top of each cookie lightly with honey and carefully stick the skulls on top, smoothing them in place with your fingers to ensure a neat fit.
7. Knead the Black Icing as above, and then roll out thinly. Cut out 16 pairs of eyes using a small round cutter, and then use either a small heart-shaped cutter or another small round cutter, stamp out 16 shapes for the nose. Re-roll the trimmings and cut out 16 small oblongs for the mouths.
8. Secure the shapes on top of each cookie using a little water. Roll out the Ready to Roll Colour trimmings and cut out shapes to decorate the top of the skulls – we used half flower-shapes topped with smaller flower shapes, finished with a dot of Black Ready to Roll Icing.
9. Pipe dots and swirls to decorate your cookies using the Designer Icing and Writing Icing. Leave to dry for about 30 minutes before serving.
TIP: If you fancy a more daring Mexican flavour to liven up your Halloween celebrations, replace the ground cinnamon with 3-6g (5-10ml/1-2 tsp) chilli powder to taste. Or if you prefer something more fruity, leave out the spice altogether and add 5ml (1 tsp) Dr Oetker Valencian Orange Natural Extract for a zesty note.
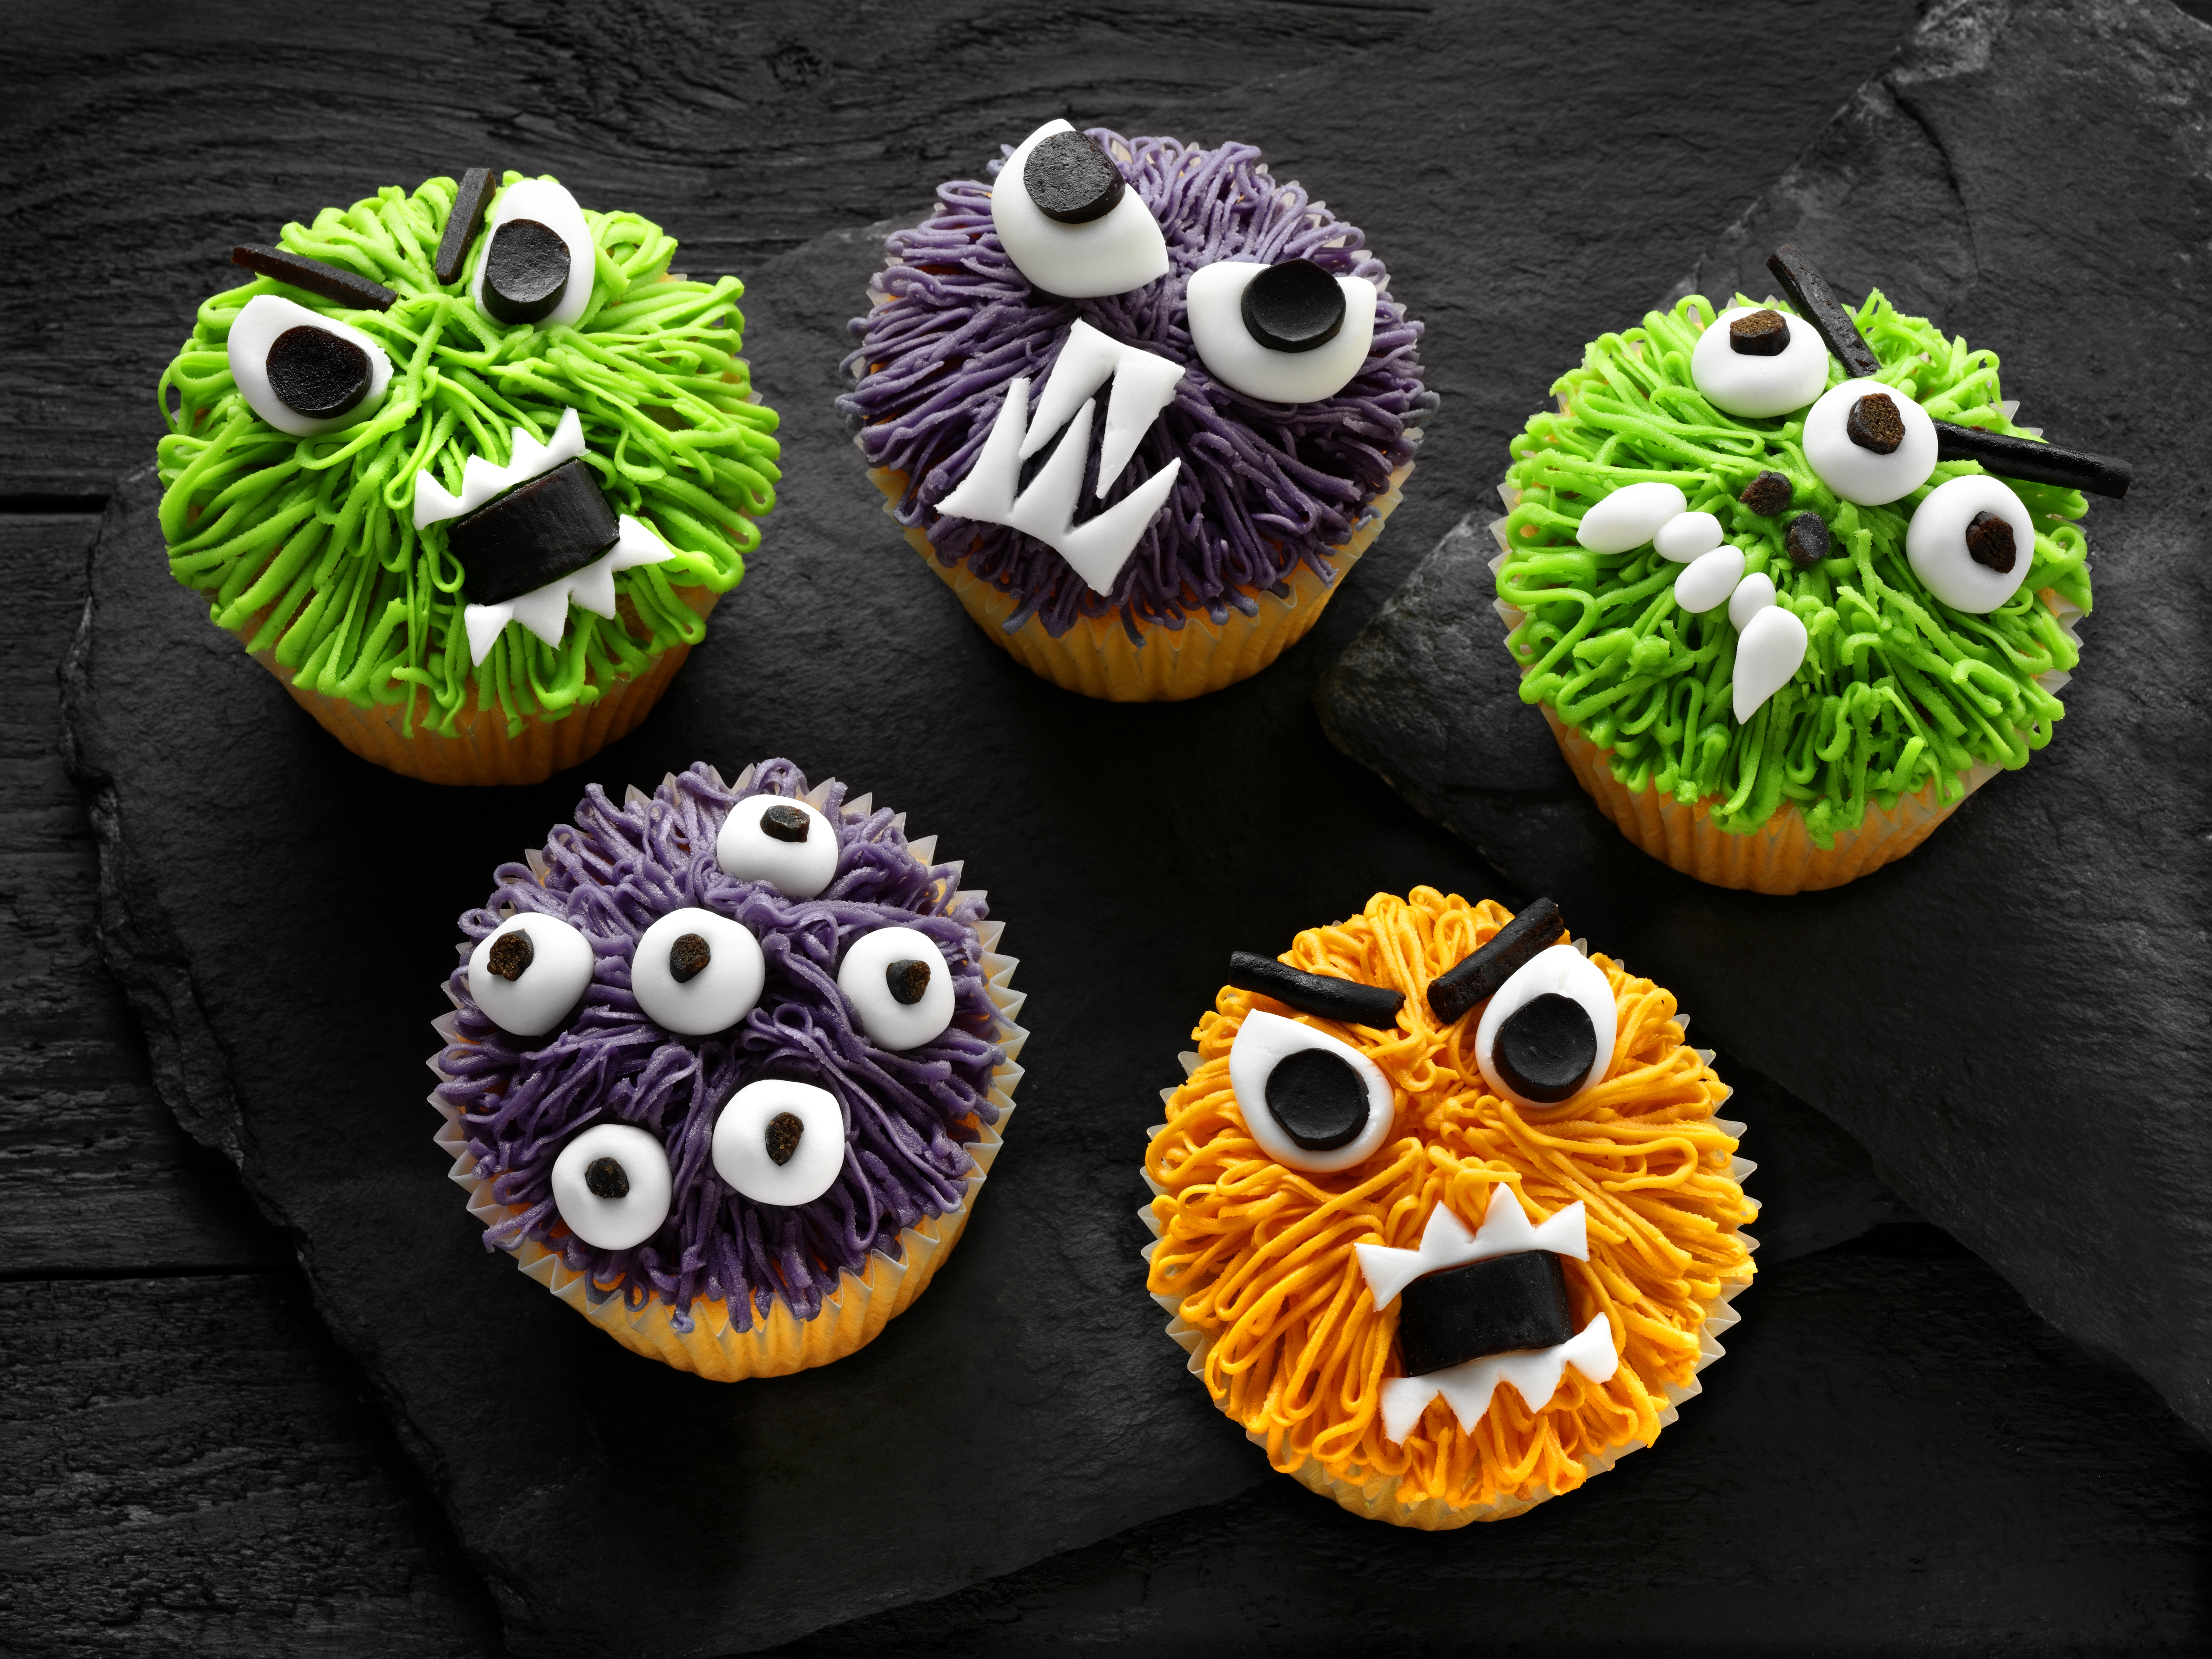
Halloween Monster Cupcakes
Preparation time: 1 hour plus cooling
Cooking time: 20 minutes
Makes: 12
Ingredients
- 12 Dr. Oetker Muffin Cases
- 125g (4 ½ oz) Baking margarine, softened
- 125g (4 ½ oz) Caster sugar
- 5ml (1 tsp) Dr. Oetker Madagascan Natural Vanilla Extract
- 2 Large eggs, beaten
- 175g (6oz) Self raising flour
To decorate:
- 75g (3oz) Unsalted butter, softened
- 150g (5oz) Icing sugar + extra for dusting
- 5ml (1 tsp) Dr. Oetker Madagascan Natural Vanilla Extract
- Dr. Oetker Extra Strong Food Colour Gels (Orange, Green and Violet)
- 115g (4oz) Dr. Oetker Regal-Ice White
- 40g (1 ½ oz) Black liquorice
Method
1. Preheat the oven to 180°C (160°C fan oven, 350°F, gas mark 4). Put the Muffin Cases in 12 cupcake or muffin tins. Put the margarine in a bowl with the caster sugar, eggs and Vanilla Extract. Sift the flour on top. Using an electric whisk, gently mix the ingredients together until well blended.
2. Divide the mixture equally between the Muffin Cases. Smooth the tops and bake for about 20 minutes until risen, and lightly golden. Transfer to a wire rack to cool completely.
3. To decorate, put the butter in a bowl and beat until smooth. Gradually sieve and mix in the icing sugar to make a smooth, creamy icing. Stir in the Vanilla Extract. Divide into 3 equal portions and colour each with 2.5g (2.5ml/1/2 tsp) of a different Colour Gel, and mix well.
4. Spoon the icing into 3 uncut small piping bags or small, clean, sturdy plastic food bags. Snip a tiny corner from the bags. Working on one colour at a time, pipe thin strands of icing, in short lines, back and forth, working your way round the top of the cake, from the centre to the edge. Continue piping strands on top, in layers, to build up a “hairy” look.
5. When all the cakes are iced, knead the Regal Ice to soften it and then form into various sized eye shapes and teeth – use a little icing sugar to stop the icing sticking. Cut up small pieces of liquorice and push into the eye balls, and use some for open mouths, nostrils and eye brows. Arrange all the pieces on top of the cakes to make monster faces. Your cakes are now ready to serve, scare and enjoy!
TIP: The great thing about making these colourful monsters is that you don’t need any special equipment. If you don’t have piping bags, choose a small plastic bag that is made from quite thick polythene. If the plastic is too thin, the bag may burst when you are squeezing out the icing. Trim away the tiniest piece of the bag corner to pipe through in order to achieve the thinnest of piping; this way you will achieve the best “hairy” effect for your monsters.
