 Look, I’m no baker. But I can totally appreciate a perfect looking sweet treat when I see one.
And these desserts, from Dr. Oetker, are almost enough to see me in the kitchen tomorrow, slaving over the stove. Almost.
But for those of you with better kitchen skills (and without a toddler to keep entertained!) here are three recipes that will definitely say I love you this Valentine’s Day…
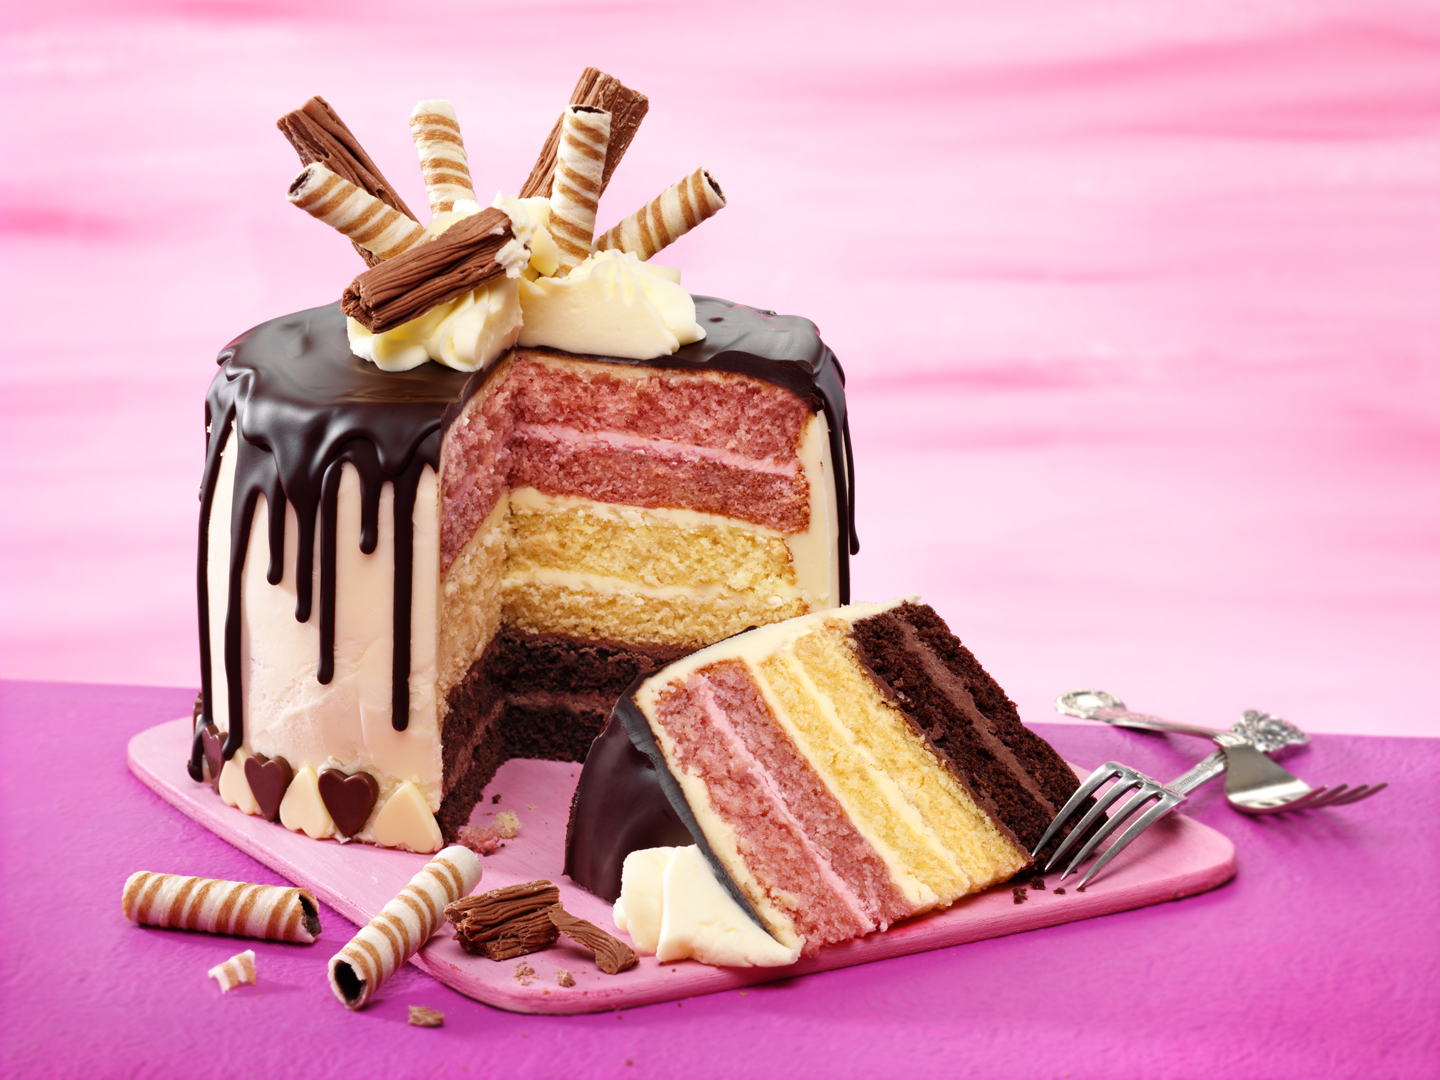
Neapolitan Style Drip Cake
A great cake to impress your special someone.
Ingredients:
- 225g (8oz) baking margarine, softened
- 225g (8oz) caster sugar
- 4 medium eggs, beaten
- 30ml (2 tbsp) whole Milk
- 275g (9 ½ oz) plain Flour
- 3 sachets /15g (1 tbsp) Dr. Oetker Baking Powder Tub
- 1 sachet /25g (1oz) Dr. Oetker Fine Dark Cocoa Powder Tub
- 2.5ml (1/2tsp) Dr. Oetker Madagascan Vanilla Natural Extract – 35ml
- Dr. Oetker Extra Strong Pink Gel Food Colour
To decorate:
- 340g (11½ oz) unsalted Butter, softened
- 600g (1lb 5oz) icing Sugar
- 60ml (4 tbsp) whole Milk
- 7.5ml (1 ½ tsp) Dr. Oetker Madagascan Vanilla Natural Extract
- Dr. Oetker Extra Strong Gel Food Colour Hot Pink
- 100g (3 ½ oz) Dr. Oetker Fine Cooks’ Dark Chocolate 54%
- Dr. Oetker Chocolate Hearts
- 4 café Curl Wafers (Halved)
- Mini chocolate flakes
Method:
- Preheat the oven to 180 C (fan oven 160 C, 350 F, gas 4). Grease and line 3 x 15cm (6 inch) round cake tins.
- Put the margarine in a mixing bowl with the caster sugar, eggs and milk. Sift the flour and Baking Powder on top and using an electric whisk on a low speed, gently blend the ingredients together. Increase the mixer speed and whisk for a few more seconds until thick and well mixed.
- Divide the mixture equally between 3 bowls. Put aside 10g (2 tsp) Cocoa Powder for the icing, then sift the remainder on to one portion of cake batter and mix in well. Spoon into one of the prepared tins and smooth the top.
- Mix the Vanilla Extract into another batch of mixture and spoon into another of the tins. Smooth the top.
- Add 25 drops Hot Pink Gel Food Colour to the remaining mixture and mix well. Spoon into the remaining tin and smooth the top.
- Bake the cakes for about 30 minutes, until risen, lightly golden and firm to the touch. Cool for 5 minutes then turn on to a wire rack to cool completely. Using a serrated knife, trim away the cake tops to make them flat and carefully slice each cake in half.
- To decorate, put 300g of the butter in a large bowl and beat until smooth. Gradually sieve and mix in the icing sugar to make a smooth buttercream, then mix in the milk to make a more spreadable consistency. Transfer 150g (5oz) to another bowl, add the 10g reserved Cocoa Powder, and mix until well combined.
- Put the remaining buttercream into another bowl and add a few drops Hot Pink Gel Food Colour to make a pretty pastel shade. Mix the Vanilla Extract into the remaining icing.
- Place one half of the chocolate cake on a serving board or plate and spread over half the chocolate buttercream. Sandwich together with the chocolate half and spread the remaining chocolate icing on top.
- Place a plain cake half on top and spread with 75g (3oz) vanilla buttercream. Sandwich together with the other half and spread the same amount of icing on top.
- Repeat the layering with the pink cake, using all of the pink buttercream to sandwich them together. Gently press down on top of the whole cake to make sure it is secure.
- Using about half of the remaining Vanilla icing, spread it thickly round the side of the cake, then smooth it with a palette knife – warm the blade of the knife flat and run it flat against the cake to achieve a smooth effect. Spread some of the remaining icing smoothly on top of the cake to cover it completely, and neaten the top edge to make sure it is smooth and flat. Press Chocolate Hearts around the bottom edge of the cake.
- Break up the Dark Chocolate and place in a heatproof bowl with the remaining butter and 10ml (2tsp) water. Place the bowl over a saucepan of barely simmering water until melted. Remove from the water and leave to cool for about 10 minutes until starting to thicken a little.
- Using a teaspoon, slowly working your way round the top of the cake, spoon a little of the chocolate icing at a time on to the top edge of the cake, using a slight zig-zag motion, allowing it to drip down the sides – the drips will come to their own natural halt.
- Spoon the remaining chocolate icing into the centre of the cake and carefully spread it over the top to meet the dripping edges. Leave for a few minutes in a cool place, to set.
- Transfer the remaining Vanilla buttercream into a piping bag fitted with a large closed star nozzle and pipe swirls in the centre of the cake. Gently press the wafers and flakes into the top of the cake. Your cake is now ready to present as a gift.
Gluten Free Popcorn Fudge Brownies
Perfect for someone with a sweet tooth, this recipe combines a soft brownie and blondie layer topped with caramel and crunchy popcorn.
Preparation time: 40 minutes
Cooking time: 55 minutes
Makes: 16
Ingredients
For the brownie layer:
- 150g bar Dr. Oetker Fine Cooks’ Dark Chocolate 54%
- 100g (3 ½ oz) unsalted butter, softened
- 100g (3 ½ oz) dark brown sugar
- 2 medium eggs, beaten
- 100g (3 ½ oz) gluten free plain flour
For the blondie layer:
- 150g bar Dr. Oetker Fine Cooks’ White Chocolate 26%
- 100g (3 ½ oz) lightly salted butter
- 100g (3 ½ oz) caster sugar
- 2 medium eggs, beaten
- 100g (3 ½ oz) gluten free plain flour
- 2.5ml(1/2 tsp) Dr. Oetker Caramel Flavour
For the topping:
- 1 sachet Dr. Oetker Easy Fill Cake Centres Salted Caramel
- 25g (1oz) lightly salted popcorn
Method:
- Grease and line a 20cm (8inch) square cake tin.
- First make the brownie layer. Break up 100g (3 ½ oz) Dark Chocolate into pieces and place in a saucepan with the butter and sugar. Heat very gently, stirring occasionally until melted. Remove from the heat and cool for 10 minutes.
- Whisk the eggs into the melted mixture to make a thick glossy batter. Sift the flour on top and carefully mix all the ingredients together. Pour into the prepared tin, smooth to the edges and chill in the fridge for 1 hour.
- Meanwhile, preheat the oven to 180˚C (160˚C fan oven, 350˚F, gas 4).
- To make the blondie layer, follow the same instructions for making the brownie batter as above, using 100g (3 ½ oz) White Chocolate – you will find that the melted mixture separates during melting, but once the eggs and flour are added, the mixture will blend together again. Stir in the Caramel Flavour. Carefully spread the White Chocolate batter over the brownie layer, trying not to press too heavily as you spread – there is no need to chill this layer.
- Bake for about 35 minutes until slightly risen, lightly golden and lightly crusty on top – the mixture should be slightly soft underneath. Leave to cool in the tin completely then remove from the tin, peel away the tin lining parchment and place the cake on a board.
- For the topping, melt the remaining White Chocolate as above. Put the popcorn in a bowl and squeeze in 50g (2oz) Dr. Oetker Salted Caramel Easy Fill Cake Centres and add the melted chocolate. Mix well to make sure that all the popcorn is coated.
- Squeeze the remaining Dr. Oetker Salted Caramel Easy Fill Cake Centres over the top of the cake and spread right to the edge. Spoon over the caramel popcorn mix, and spread it out so that the whole top is thickly covered. Pat it down a little using the back of a spoon.
- Melt the remaining Dark Chocolate as above. Using a teaspoon, drizzle the top all over with melted chocolate. Leave in a cool place for a few minutes to set. Using a large bladed knife, cut into 16 chunky pieces. Your brownies are now ready to serve and enjoy!
Rainbow Macaroons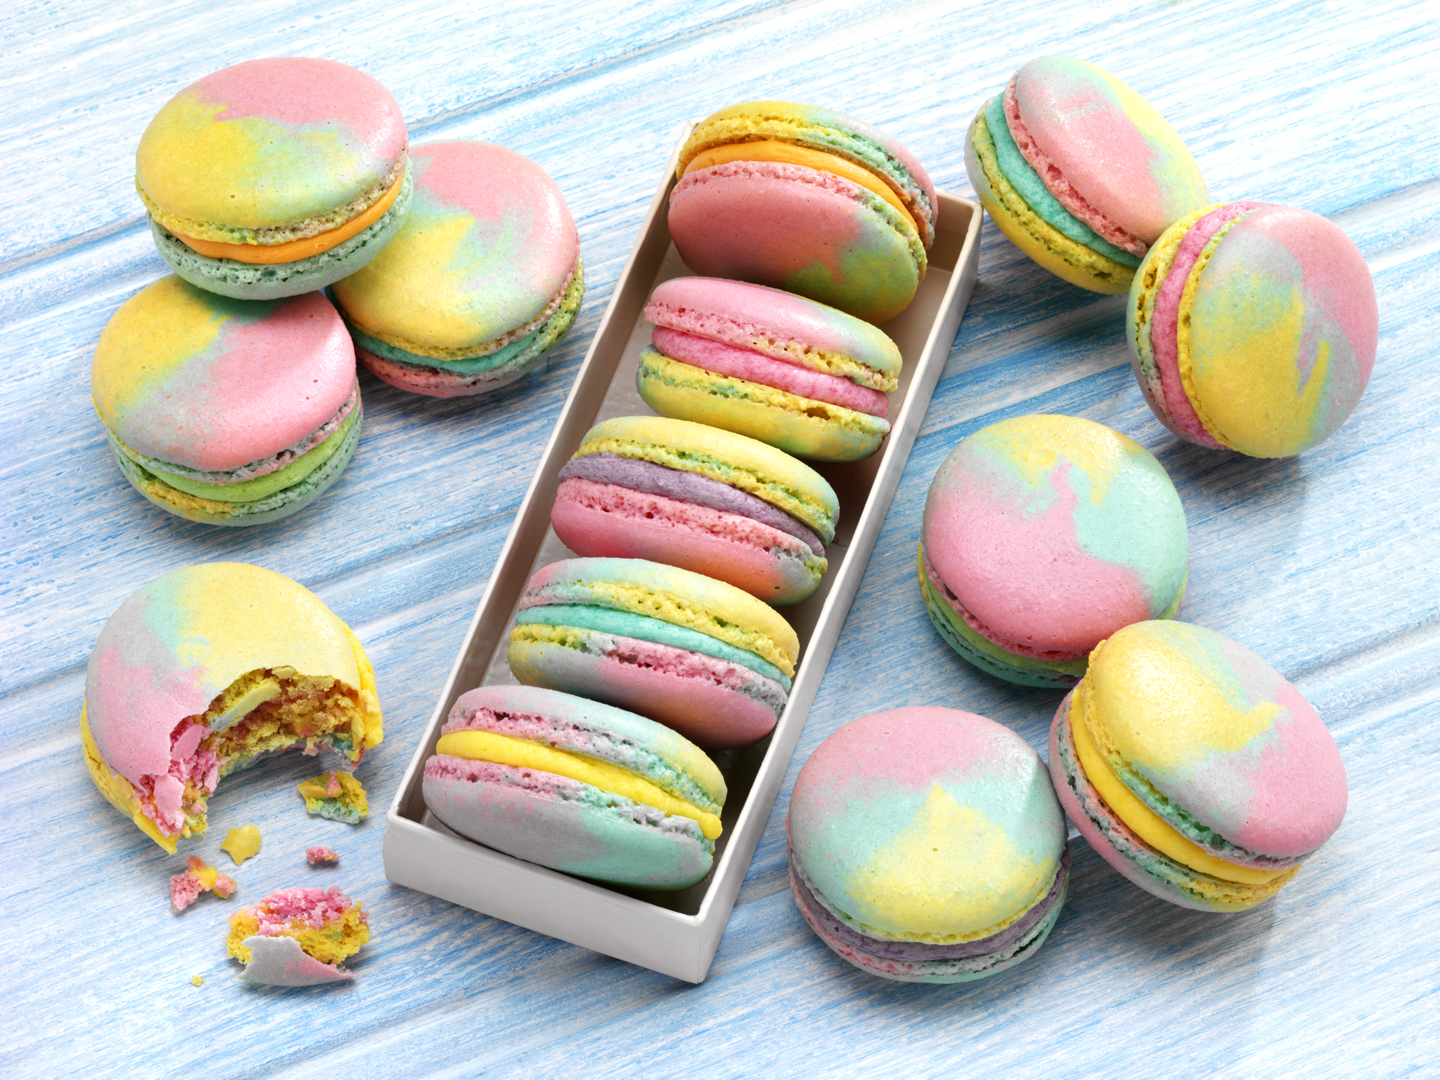
These bright Rainbow Macaroons are ideal for gifting or to simply enjoy a little sweet treat.
Preparation time: 1 hour 30 minutes plus setting and cooling
Cooking time: 1 hr 20 minutes
Makes: 14
Ingredients
- 90g (3 ¼oz) icing Sugar
- 90g (3 ¼oz) ground Almonds, very finely ground
- 2 Sachets Dr. Oetker Egg White Powder
- Pinch of Dr. Oetker Cream of Tartar Sachets
- 65g (2 ½ oz) caster sugar
- Dr. Oetker Extra Strong Pink, Blue and Yellow Food Colour Gel
For the filling:
- 75g (3oz) unsalted butter, softened
- 150g (5oz) icing sugar
- Approx. 15ml (1tbsp) whole Milk
- 2.5ml (1/2 tsp) Dr. Oetker Moroccan Almond Natural Extract
- Your favourite Dr. Oetker Extra Strong Food Colours Gel
Method:
- Line 2 large heavy-metal baking trays with baking parchment.
- Put the icing sugar and ground almonds in a food processor and pulse 10 times, then blitz for a further 10 seconds, to make a fine powder. Sieve into a bowl, and discard any coarse grains that remain in the sieve. Weigh the almond and icing sugar mix and divide into 3 equal portions.
- In a clean, grease-free bowl, make up the Egg White Powder as directed, then whisk until foamy. Add a pinch of Cream of Tartar and whisk the Egg White until very thick and stiff.
- Gradually whisk in the sugar, in 3 batches, to make a thick, glossy meringue which forms stiff peaks on the whisk beaters. Weigh the meringue and divide equally between 3 clean bowls.
- Add 30 drops of Hot Pink Gel Food Colour to one bowl. Add 30 drops of Sky Blue Gel Food Colour to another, and add 40 drops of Sunshine Yellow Gel Food Colour to the other bowl.
- Working on 1 meringue at a time, take 1 portion of the almond and icing sugar mix, and sift one third on to the meringue. Using a clean spatula, carefully work the almond and icing sugar mix into the meringue, scraping, turning and cutting the meringue into the dry ingredients, rather than stirring it. Once combined, sieve half the remaining almond and icing sugar mix on top and continue in the same way, and then sieve in the final batch of almond sugar, and incorporate in the same way.
- Once you have combined the ingredients together, continue working the batter by flattening the mixture against the side of the bowl, and then scraping and turning it again in order to achieve a smooth, dropping consistency. Repeat these steps with the other portions of meringue and almond sugar.
- Fit a large piping bag with a 1cm (1/2 inch) plain round nozzle. Fold back the bag by about one third in order to allow you to spoon the mixture into the bag more easily. Resting the piping bag on the work surface, spoon the pink almond mix into the centre of the bag and smooth it into a long rectangular shape. Carefully spoon the blue mix on top, and gently spread over the top of the pink. Finally, spoon over the yellow and spread it to cover the blue.
- Holding the bag end closed, gently push the mixtures towards the nozzle, then carefully gather up the bag and holding the bag with the nozzle upright in the air, twist the bag closed. Now you are ready to begin piping.
- Hold the bag with the nozzle pointing down then pipe 4cm (1 ¾ inch) flattish rounds onto the lined baking trays spaced a little apart (twist the bag occasionally to keep a steady flow of mixture). You should be able to pipe 28 rounds.
- Preheat the oven to 150 C (fan oven 130 C, 300 F, gas 2).
- Lay a thick towel on the work surface. Holding a tray firmly at either side, gently tap the tray about 20 times on to the towel, to smooth and settle the tops. Pop any air bubbles that rise to the surface with a clean pin or cocktail stick. If the piped nozzle tail is still visible on the top of the macaroons, you can gently push it into the mixture with a wetted finger. Repeat with the other tray and leave the trays to stand at room temperature for about 30 minutes, until a slight skin forms on the surface – the outside should be dry, not sticky, when touched lightly with your finger.
- Bake the trays, one at a time, on the middle shelf, for about 40 minutes until firm – the bases should be firm when cooked, and the tops crisp and should not wobble. Leave to cool for about 15 minutes on the tray until you can carefully peel the macaroons from the parchment. Transfer to wire racks to cool completely.
- Divide the icing into as many bowls as you want different colours, and add a few drops of your favourite Dr. Oetker Gel Food Colours to make vibrant shades.
- For a super-neat finish, use small piping bags fitted with 1/2cm (1/4 inch) plain nozzles and pipe the icing in a circular swirl over the flat side of half the shells. Alternatively, use a small palette knife to spread the icing neatly. Sandwich the halves together. Your pretty macaroons are now ready to present.
Note: Unfilled macaroons will keep in an air tight container for 2 weeks. To enjoy macaroons at their best, they should be filled just before serving; after a few hours, the texture may soften once the filling settles into the macaroon shells. Do not refrigerate.
For more recipes, go to www.oetker.co.uk
